aNewDomain — One of the most powerful features of cloud-based computing is the ability to share folders and files with other people. Whether you are collaborating on a project with colleagues at work or merely trading recipes with friends, the ability to exchange information without emailing it back and forth is liberating. Here’s How To share folders in OneDrive for Business the easy way — and the safe way.
OneDrive is the cloud service in the Microsoft ecosystem, of course. And, in case you are wondering, if you subscribe to Microsoft Office 365 then, yes, you should be using OneDrive for Business. After all you are paying for the access and additional storage whether you are using it or not. The consumer version of OneDrive is made available when you create your standard Microsoft account, which is generally what you use to login to your Windows computer.
So here’s How To create shared folders in OneDrive for Business. This procedure also works in the consumer version of Microsoft OneDrive.
Shared Folders in OneDrive for Business: Step by Step
First, navigate to OneDrive for Business using Windows File Explorer. Once there, choose an existing folder or click/tap the New Folder icon to create a new one. Or use the keyboard shortcut CTRL-Shift-N.
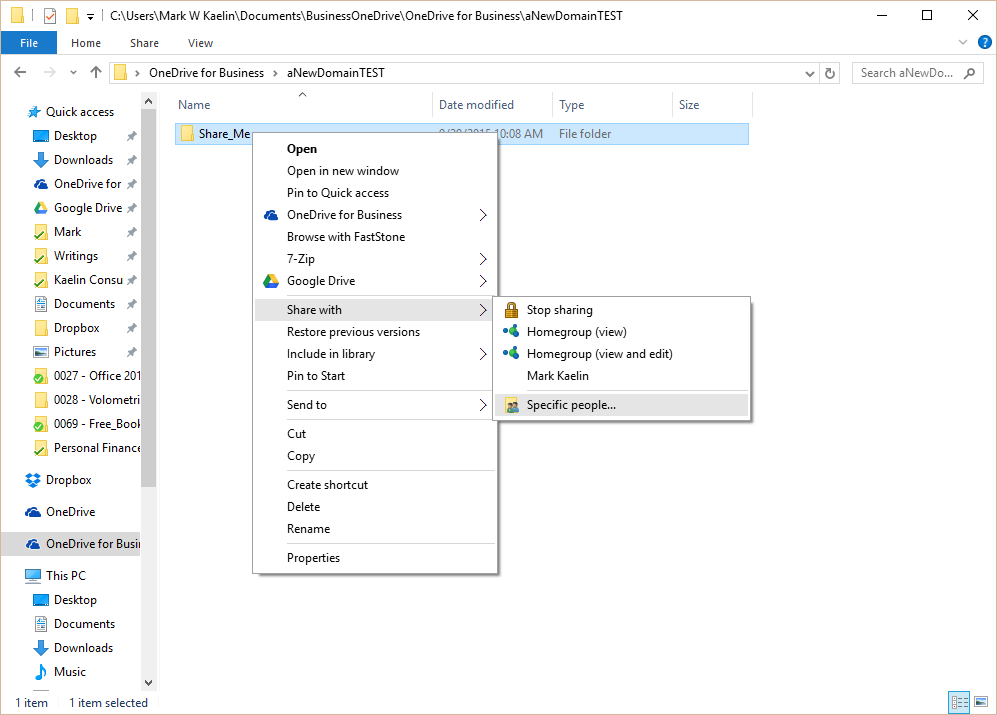
Right-click on the folder you want to share and navigate to the Share with menu item to find the sharing options, as shown below.

The options include your Homegroup, if you have one, names of people you previously shared with, and a menu item for sharing with specific people. Assuming you have a specific person you want to share this folder with, click the specific people item.

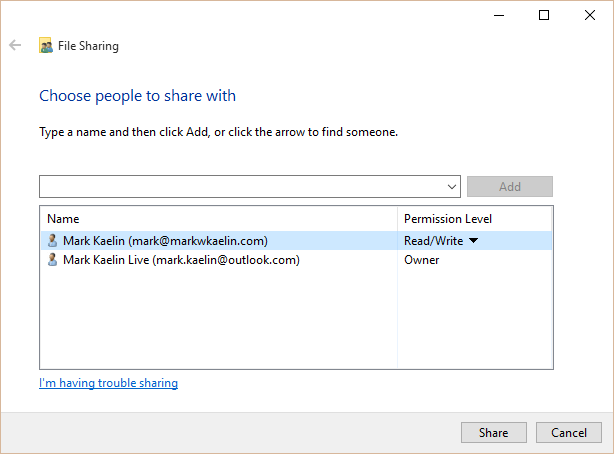
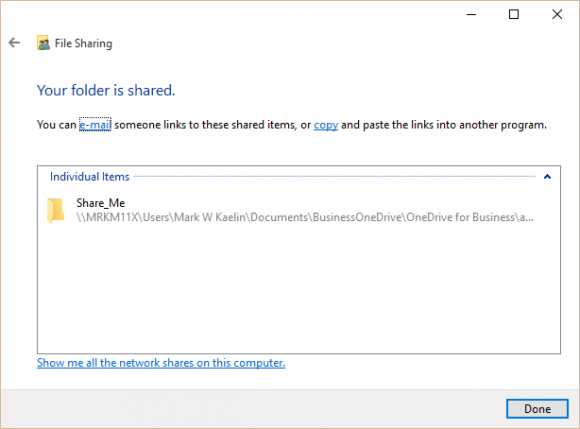
From here you choose people to share with — and the permissions level for each. You can choose to grant read only access or you can grant full read and write access to the folder. When you are finished, click the Share button. Then you’ll get the final window in the process, shown below.

This is where you will be given the link to your new shared folder.
You can either email the link or you can copy it for later dissemination.
Note, if your link is very long, like mine, it is possible the link will break in an email, so copying may be your best option. If you are sharing with someone with access to your domain, which is typical in a business environment, that person will also see the new shared folder displayed in File Explorer.
You’re done. Now that you’ve established your shared folder in Microsoft OneDrive for Business, you’ll find your users will be able to easily exchange files and documents. Be careful, though. The ability to freely collaborate and share is empowering. Don’t let that empowering feeling make you too liberal in permissions. You still need to exercise caution in deciding to whom you grant access, especially read/write access. After all, that gives these users the ability to completely delete whatever is in that folder. As the old saw goes, with great power comes great responsibility.
Images: Screenshots captured by Mark Kaelin
Featured image: Courtesy of Microsoft News


