
aNewDomain.net — Buried inside Microsoft Windows is an unheralded, unpromoted yet truly-decent speech-recognition system. It’s light years ahead of what mobile command systems like Siri use — and it’s a program in the same class as Dragon offerings. Not as great, it’s true, but it’s free. Our Lamont Wood takes a long, hard look at an often-overlooked and kind-of-hidden feature in Windows — Windows Speech Recognition. You just need to enable it, get a mic and explore …
WSR isn’t readily apparent in Windows 7 and up, but if you’re struggling to type 30 words a minute or have accessibility issues, take notice. Grab a mic, enable the WSR feature and you’ll immediately notice a dramatic improvement in texting speed. Here’s how to use Windows Speech Recognition (WSR).
Apple Siri and other mobile device command systems don’t compare to WSR or such competing systems as Dragon Naturally Speaking. The mobile programs are just machine control systems. The ability to accept and display accurate dictation is just a side effect, and not often a very good one.
If you’re going to write a novel, great American or otherwise, your only real choices on the desktop are Windows Speech Recognition or Dragon Naturally Speaking. The latter is a heavily-promoted commercial product that is startlingly accurate and can maintain that accuracy at a pace of about 120 words per minute. DNS is excellent for dictation and it’s a mature product. But it isn’t free and it isn’t already sitting on your Windows system, either.
It’s true WSR is not as good as DNS for serious and rapid dication uses — but it is good enough for a great deal of real work you need done. It’s good enough, in fact, that in the real world you won’t notice much difference between it and DNS.
Plus, WSR is way better at program control. Combine all that with the fact that WSR is a free program you already own — if you run Windows, you have it now — and WSR suddenly becomes a mighty interesting option. Play with it. Here’s how to enable Windows Speech Recognition on your Windows system and get going.
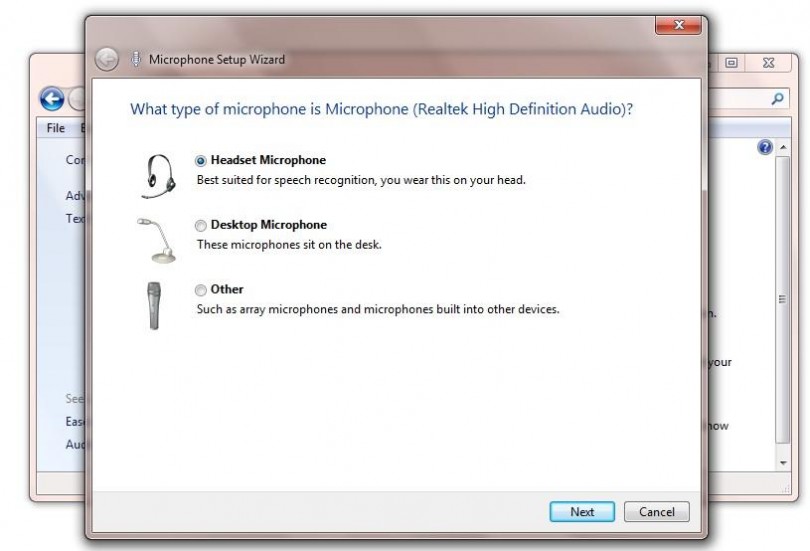
First, get a microphone. Get a headset mike with noise-canceling features. You want a microphone with noise cancellation — that way, it won’t mistake noise for commands and give you random, disruptive results. Also, you want a headset mic because it keeps the microphone in a fixed position relative to your mouth.
But don’t take it too far in the other direction. You definitely don’t need a fancy gaming headset with 5.1 surround sound.
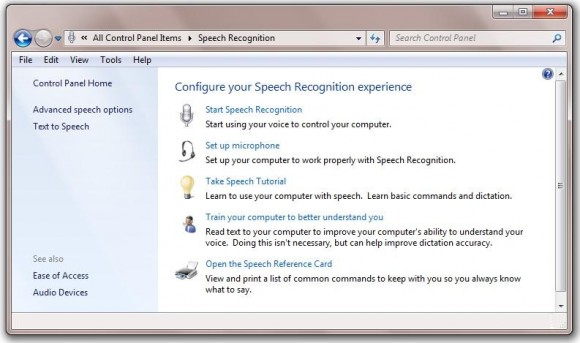
Click Start and then Control Panel and then hit Speech Recognition. You’ll see this window.
Screenshot image credits: Lamont Wood
Now click the Set up microphone icon, This brings up the Microphone Setup Wizard. Follow its steps and identify and test the mic as it requires.

Invoke a word processing program. In my example below, I’m going generic and using Windows Notebook.
Return to the Speech Recognition window you opened earlier and click Start Speech Recognition.
You should see something like this.
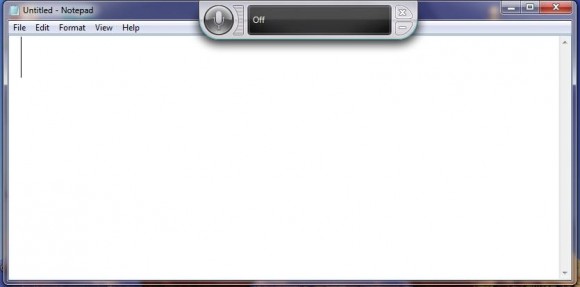
The bar you see at the top of the screen is the WSR control bar. The circle surrounding the microphone icon is initially gray, meaning that WSR is not listening. The hatched vertical icon beside it is the volume indicator. The gray rectangle to the right of that is the status readout, and currently says Off.
On the right end of the bar, notice the X (Close command) and the Minimize bar.
Now click the microphone icon. The circle around it will change from gray to blue. The status readout out will say: Listening.
Speak the following: HELLO WORLD PERIOD
Assuming you used 36-point type, you should see something like the screen below.
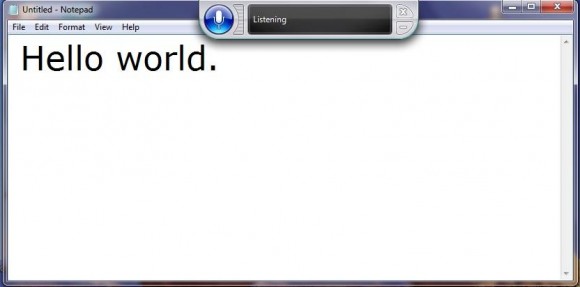
Notice that you had to pronounce the punctuation.
Also notice that the first word in the sentence was automatically capitalized but the subsequent word was not.
Formatting is completely under your control using WSR, and when it comes to text probably anything you can do on the keyboard can be done using voice commands. The same isn’t as reliable for graphics, though.
Now congratulate yourself. You’ve entered the future — one with a reduced risk of repetitive strain injury. Now go back to the Speech Recognition window you opened earlier and take the tutorial. Don’t forget to print out the reference card and run through the recognition training system.
Give yourself about two weeks to become productive. Yes, there are adjustments you’ll have to make, and a few tips and traps to learn. We will cover some of them in future postings.
But you can be sure that, compared to the effort it took to learn to type, the learning curve involved in speech recognition is fairly trivial.
For aNewDomain.net, I’m Lamont Wood.
Based in San Antonio, Texas, Lamont Wood is a senior editor at aNewDomain.net. He’s been covering tech trade and mainstream publications for almost three decades now, and he’s a household name in Hong Kong and China. His tech reporting has appeared in innumerable tech journals, including the original BYTE (est. 1975). Email Lamont at Lamont@anewdomain.net or follow him @LAMONTwood.


[…] Well, WSR is free and is already installed. But you can’t use it until you acquire and install a suitable headset microphone and then figure out how to invoke the software. […]