

aNewDomain — Xubuntu version 13.04 has been working smoothly on my aging ASUS notebook for quite a while. I usually wait a few months before upgrading to a new version so I don’t run into many kinks. This past week, I set to work getting Xubuntu 14.04 on my machine. Here’s a quick run down on the high points of the build. The whole thing took about an hour.
I like to partition my drive so it’s easy to load new releases without affecting my user files. For example, on a typical 750 GB hard drive, I might use 100 GB for /, about 350 GB for the /home directory, another 150 GB for /disk2, and the remainder for /disk3.
Download Xubuntu 14.04 and put it on a stick
By far, the easiest way to upgrade to a new version is to download the .ISO file and install it from a bootable USB stick.
Before you can create a bootable version of Xubuntu on a USB stick, you should download the latest build of Xubuntu 14.04 (an .iso file) to your hard disk.
There’s a nice little program called Startup Disk Creator under the main XFCE menu that’s used to make the stick. Go to Settings Manager and scroll down to the Startup Disk Creator icon. Select it. You should see a screen like the one you see below.
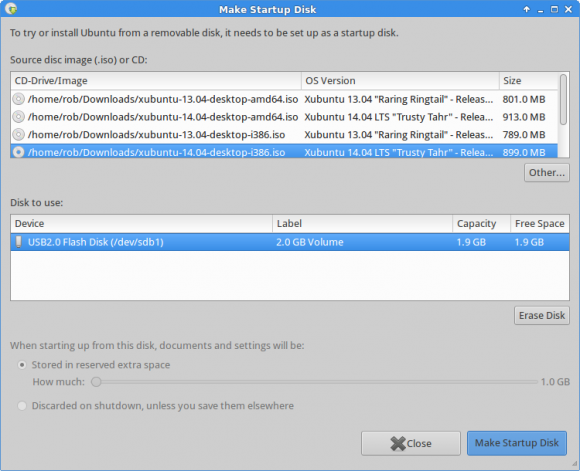
Select Other. Now find the Xubuntu .iso file you just downloaded. Most likely it’ll be in the Downloads directory under your user name. Click it and it will be added to the Sources list. Next, plug a USB stick (minimum 2 GB) into a port. The stick should appear in the Disk To Use list. Select it and push the Erase button. Hit Yes to erase the stick. You might have to enter your user password once or twice.
Finish up by clicking the Make Startup Disk button.
It will go through copying files to the stick and some additional configuration. You’ll end up with a bootable stick.
Install Xubuntu 14.04 to the notebook
Plug the USB stick into the port and reboot the machine. Pressing the ESC key during boot-up gets me to the screen to select the boot device on my ASUS.
After a short time, you’ll get the install screen and can choose between trying and installing Xubuntu. Choose “Install”.
The installer will go through a number of different screens asking about such things as your time zone, the language you want to use, and so on.
To me the biggest job is wiping the root (/) directory during the partitioning process. I always choose “Other”, instead of letting Xubuntu figure out how the disk should be laid out. The only partition I format is the root directory. I also add mount points to the different partitions. Root is “/”, the home directory is “/home” and so on, for the other partitions.
Once you’re done with partitioning, Xubuntu will proceed to load the base version of software. It includes basic tools like a package manager for installing software (called Ubuntu Software Center), the Firefox browser, the Thunderbird email client, and a number of common Linux utilities.
You’ll also have to set a user name and password. Re-use your old user name, so you don’t have to change any of the permissions on your files, under the untouched /home directory.
After the installation completes you can remove the stick and reboot the machine, from the hard drive, into the new version of Xubuntu.
Post Installation Cleanup And Next Steps
Personally, I like to load software using the Synaptic package manager, so that’s the first program I add after a new rebuild. It can be found under Ubuntu Software Center.
Next, I like to go into Synaptic and reload all the repositories, mark the latest updates, and hit apply to bring the system up to the latest and greatest version of everything.
Lastly, I load LibreOffice and the Chrome browser. If you want the absolute latest packages, you may have to go and get them at the specific project’s Website
That’s about it for a basic build of Xubuntu 14.04. It’s pretty straightforward and light-years ahead of installations…in the old days.
For aNewDomain, I’m Rob Reilly.
Based in Orlando, Rob Reilly is an independent consultant, writer, and speaker specializing in Linux/Free Software, Open Hardware, the tech media, and the mobile lifestyle. Follow him on Twitter @RobReilly and find his posts on Google +


Thanks for this Rob
Works well on a Chromebook also. ;)
-RAP, II
This was exactly what I wanted to know right now. Thanks Rob and Gina.